How to Pack a Seabag – Every Item Count, Every Detail Matter
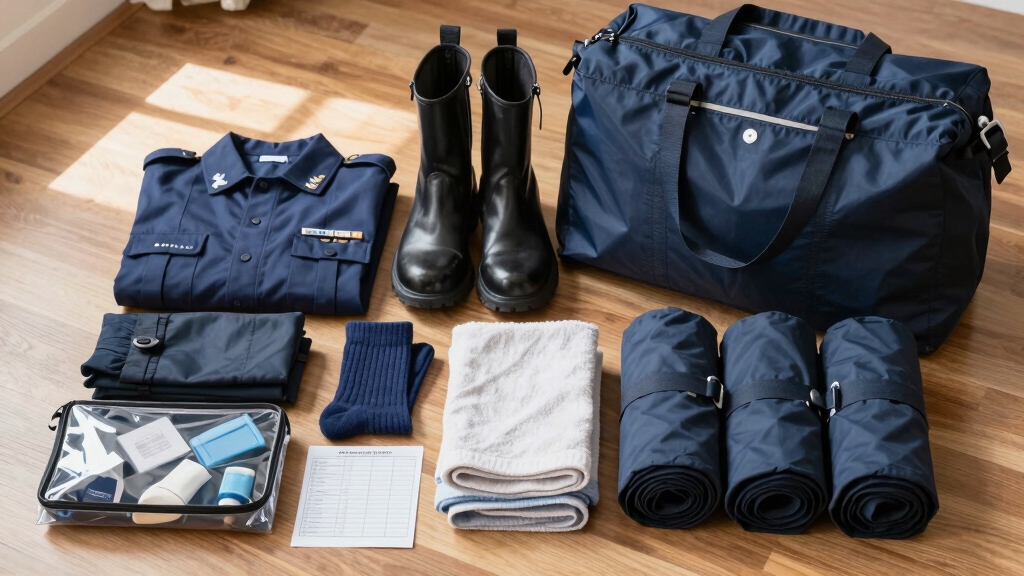
To pack your seabag efficiently, start by taping two hangers together to create a firm base that prevents sagging. Set up the water-resistant liner properly, then fold and stencil uniforms per official Navy standards to avoid inspection issues.
Pack only authorized items in correct quantities, use plastic bags to keep contents stable, and secure the drawstring tightly with a lock to prevent tampering. Following these steps guarantees durability, compliance, and readiness.
You’ll want to understand each detail to optimize your packing.
Key Takeaways
- Prepare a firm base by taping two hangers into a square and placing it at the seabag’s bottom to prevent sagging.
- Fully unroll and reshape the liner, insert the sleeping pad centrally, then secure it upright with grommets and locking loop.
- Follow official uniform packing guidelines, including correct quantities, labeling, and stenciling per Navy or Coast Guard regulations.
- Fold uniforms carefully using seams and tissue to avoid creases, and allow stenciled items to dry before packing.
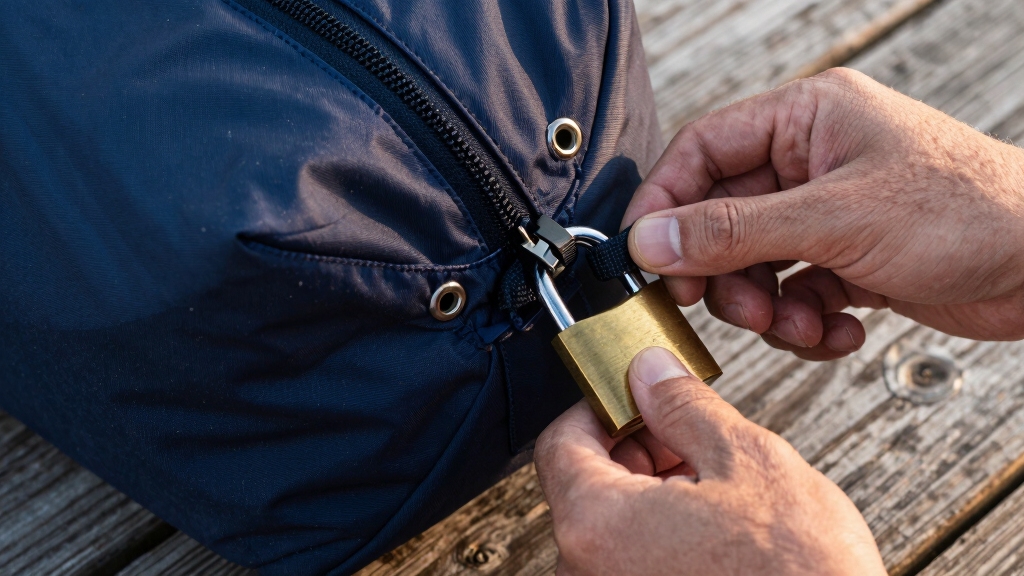
- Secure contents with internal Ziploc walls, tighten the drawstring using the locking loop, and lock the bag to prevent tampering.
Preparing the Seabag Bottom
To start, set up a firm base for your seabag by taping two standard hangers together at the edges. This creates a square platform that fits snugly into the bag’s bottom.
Tape the edges firmly to prevent separation during packing. Insert this platform into the bottom to make it rigid and upright. Using a rigid base aligns with best practices for maintaining structure and durability in soft-sided bags.
This simple step assures your bag stands square, providing a stable foundation for even distribution of items. A rigid base prevents sagging under heavy loads and facilitates proper layering from the bottom up. Without this support, the bag’s floppy bottom can cause it to look bad and unstable during travel, which is why the bottom support solution is crucial.
This method mimics military packing standards, improving inspection readiness. The taped hanger platform is compatible with standard seabag grommets, quick to assemble in under two minutes, and reusable for multiple packings without wear.
Setting Up the Liner
With the seabag base secured and rigid, you’ll next set up the liner to create a protective and organized interior. Start by removing the liner from its plastic wrap and unrolling it fully, standing to the side to avoid tangling.
The liner is typically made from a tarp-like material that is somewhat water-resistant but not fully waterproof, so care should be taken during packing. For added security during travel, consider using a TSA-approved lock to safeguard the seabag contents without risk of damage during inspections.
Begin by unrolling the liner carefully, ensuring it remains untangled and ready for setup.
Roll it briefly in the opposite direction to reshape. Lay the seabag flat and insert the sleeping pad into the liner’s center, allowing it to unspool and expand naturally. Shake the liner to settle the pad evenly, then pull the sides outward so the liner stands upright independently.
- Unroll liner carefully to prevent tangles
- Insert sleeping pad fully to expand liner
- Pull sides outward to shape and stabilize
- Secure liner with grommets and locking loop
This setup guarantees a sturdy, tamper-resistant liner base for efficient packing.
Packing According to the Official List
Although packing may seem straightforward, adhering strictly to the official list guarantees you include only authorized items and meet inspection standards.
Use Navy and Coast Guard official regulations to guide your selections, focusing on required quantities of uniforms, footwear, belts, and hygiene items.
Label all items correctly; nametapes, embroidery, and insignia must conform to precise size and color standards. Stencil your duffel bag and use approved marking methods to avoid inspection citations.
Personal hygiene kits must exclude aerosols and include mandated items like towels, washcloths, and gender-specific essentials. Bring a sea bag with combination lock to secure your belongings properly during training.
Using a TSA-approved lock can help ensure your bag remains secure while complying with security protocols. Make sure you pack only listed footwear types and protective gear.
Missing or improperly marked items can result in penalties, so cross-check your seabag against the official entitlement and command packing lists before inspection.
Folding and Stenciling Uniforms
Folding and stenciling your uniforms properly guarantees they stay sharp and identifiable throughout transit and inspection.
Fold jackets inward along seams, sleeves diagonally across the back, then roll from hem to collar, using tissue to prevent creases and protect insignia. Measuring the jacket’s dimensions accurately helps ensure it fits well in your seabag without unnecessary wrinkles or damage.
Fold jackets inward and sleeves diagonally, then roll hem to collar with tissue to avoid creases and protect insignia.
For trousers, align seams, fold cuffs up, then fold over to maintain creases, or roll loosely when space is tight. Proper folding techniques maximize packing potential by maintaining the garment’s shape and minimizing bulk.
Shirts require buttoning, diagonal sleeve folds, and a small collar roll to avoid creases. Apply stencils with branch abbreviation, last name, and unit in regulation font on designated locations using fabric-safe paint.
Let them dry fully before packing to prevent smudging. When preparing your seabag, ensure the straps are positioned to face the folder to facilitate proper folding. Consistent bag measurement practices confirm your seabag meets size requirements and help organize your belongings efficiently.
- Fold jacket sleeves diagonally, roll hem to collar
- Fold trousers to preserve creases or roll loosely
- Button shirts, fold sleeves diagonally, roll collar
- Stencil uniforms clearly, air dry before packing
Securing and Locking the Seabag Contents
Once your uniforms are neatly folded and stenciled, securing the entire seabag properly guarantees nothing shifts or opens during transit.
Begin by creating a stable base: tape two standard hangers edge-to-edge to form a square platform that fits the bag’s bottom. Secure this platform into the four corners to prevent collapse and evenly distribute weight.
It is also helpful to use Ziploc bags to create protective walls inside the seabag to keep items organized and prevent shifting. Regularly inspecting and maintaining the bag’s structure helps prevent wheel damage during transport.
Next, tighten the drawstring by looping one side in the center, threading the others through to create tension. Pass the final eyelet through the square latch, bypassing the hook, to secure the grommets firmly.
Thread a lock through the last eyelet to prevent tampering and keep contents immobile. Roll packing material inward to stabilize sides and protect against moisture.
Frequently Asked Questions
Can I Personalize My Seabag With Patches or Decorations?
Yes, you can personalize your seabag with patches or decorations. Iron-on patches provide durable, heat-applied designs, while sewing them adds extra security.
Enamel pins offer removable, stylish flair without damaging fabric. Embroidery creates long-lasting, professional-looking patterns that resist wear.
Combine these methods for layered effects and consider symmetrical placement or clustering for visual balance. Personalizing your seabag enhances both its appearance and durability effectively.
How Do I Clean My Seabag Before Packing?
You might think machine washing is best, but gentle spot cleaning often protects your seabag better.
Use a damp cloth with mild soap to wipe stains, testing any cleaner on a hidden spot first. Avoid bleach or harsh chemicals as they damage fabric and fade colors.
Hang your bag by the handles to air dry in shade; never use a dryer. This preserves seams, handles, and vintage insignia, keeping your seabag ready and durable.
What Is the Best Way to Pack Toiletries and Personal Items?
Pack your toiletries by zoning items into functional groups like oral care and skincare in a waterproof, wipeable kit. Use clear, leakproof bags for liquids and label small items in zip pouches.
Opt for multi-use, concentrated products to minimize bulk. Store fragile bottles in padded sleeves and liquids upright in sealed pouches to prevent leaks. Keep frequently used items accessible in top compartments and maintain an inventory checklist for quick inspections.
Are There Restrictions on Electronic Devices in the Seabag?
Yes, you must follow cruise lines’ strict rules on electronics in your seabag. Surge-protected power strips and extension cords are banned due to fire risks. Bluetooth speakers, drones, Wi-Fi routers, and remote-controlled devices are also prohibited and may be confiscated.
Non-surge protected power cubes with USB outlets are usually allowed. Always check your cruise line’s specific policies before packing to avoid confiscation and guarantee a smooth boarding process.
How Do I Handle Damaged or Missing Official Uniform Items?
When you spot damaged or missing uniform items, report them immediately before securing your seabag. Identify and note any issues during packing or inspection, ensuring grommets and locks aren’t fastened yet.
This helps maintain a complete inventory and prevents delays. Replace damaged gear promptly, relying on your home supply or requesting new items as needed. Always follow regulations to keep your uniform serviceable and inspection-ready.
More Than Packing: Preparing for What Lies Ahead
By carefully preparing your seabag, you’re not just packing gear; you’re crafting a reliable companion for the challenges ahead. Setting up the liner and following the official list guarantees nothing essential slips through the cracks.
Folding and stenciling your uniforms with care reflects your discipline, while securing and locking the bag preserves your readiness. This isn’t just about packing; it’s about embracing responsibility and readiness for whatever comes next.
Your seabag carries more than items; it carries your commitment.